EspruinoRobot
The robot that was actually built as a source of inspiration is a three-wheeled one, with three HC-SR04 sonars, a buzzer and an infrared reader. Two wheels are controlled by a BB-L298 motor driver.
The connections are as follows:
------------------------------------
Pin          Device
----         -----------------
B3           Infrared
B6           Buzzer
C0           Left Sonar, echo
C1           Left Sonar, trigger
C2           Front Sonar, echo
C3           Front Sonar, trigger
A15          LED 3, Blue
A14          LED 2, Green
A13          LED 1, Red
C5           Right Sonar, echo
C4           Right Sonar, trigger
A2           Motor Shield B, enable
A3           Motor Shield B, IN 1
A4           Motor Shield B, IN 2
A5           Motor Shield A, IN 1
A6           Motor Shield A, IN 2
A7           Motor Shield A, enable
----------------------------------------
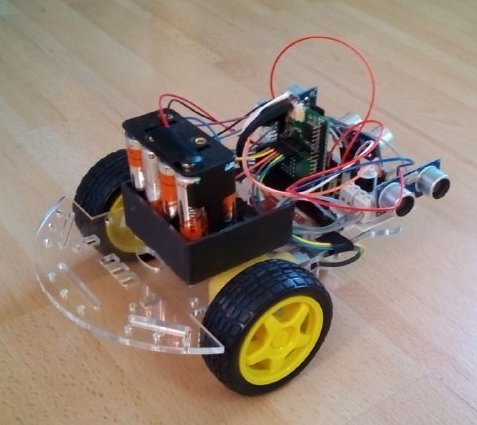
The robot actually built.
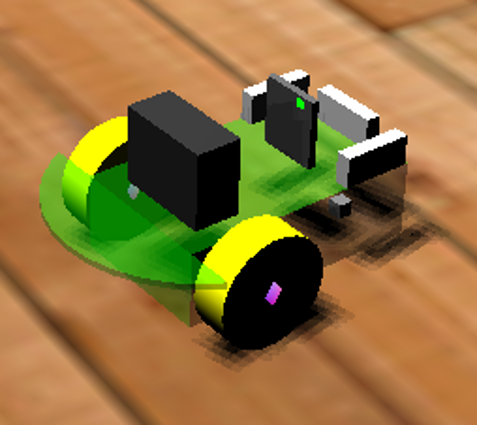
The robot as simulated in the virtual environment.
To actually work with the robot, you can use the code of the file of its application controller.
The last line of the code reads
module.exports = ThreeWheelDistanceSensingRobotController;
because this file is meant to be used as a module.
If you use Espruino's Web IDE, you can start a project in which your code is as follows:
// file myFirstProject.js
var hcsr04 = require("HC-SR04");
var ir = require("IRReceiver");
var ThreeWheelDistanceSensingRobotController = require("ThreeWheelDistanceSensingRobotContoller");
var r = new ThreeWheelDistanceSensingRobotController();

r
.setup()
.beep()
;
The file ThreeWheelDistanceSensingRobotController.js should be placed in the modules directory of your project.
myEspruinoProjects/
├── binary
├── firmware
├── modules
│   └── ThreeWheelDistanceSensingRobotController.js
├── projects
│   └── myFirstProject.js
├── snippets
│   └── terminalsnippets.txt
├── testing
└── testinglog
If you want to save the program into flash, as described in the reference, and let your robot do something when it powers on or is hard-reset, you can modify your project like this:
// file mySecondProject.js
var hcsr04 = require("HC-SR04");
var ir = require("IRReceiver");
var ThreeWheelDistanceSensingRobotController = require("ThreeWheelDistanceSensingRobotController");
var r = new ThreeWheelDistanceSensingRobotController();
E.on('init', function() {
    r
    .setup()
    .beep()
    ;
};
When it is loaded, just type
save();
at the console.
If your flash memory is not big enough to store the program, you can try
and create an optimized version of the controller's code, using tools like
Google Closure Compiler. Put
the optimized code into the modules directory with a min.js extension,
like this:
myEspruinoProjects/
├── binary
├── firmware
├── modules
│   ├── ThreeWheelDistanceSensingRobotController.js
│   └── ThreeWheelDistanceSensingRobotController.min.js
├── projects
│   ├── myFirstProject.js
│   └── mySecondProject.js
├── snippets
│   └── terminalsnippets.txt
├── testing
└── testinglog
If this fails, remove some unused functions to save space.
The simulation environment provided by RoboThree is good for exercises and experiments, but quite different from the real things you can do with a real robot equipped with an Espruino board.
First, wheels rotate much faster in the real world: I tried to slow them down a bit, but at the minimum speed the robot moves faster than the simulated one.
Second, the robot I built uses motors that do not have the same behavior, and this makes it difficult to get the robot going straight forward or straight backward.
Third, sonars do not "read" values precisely like the simulated ones.
Please keep in mind that RoboThree is a simulation environment, not a prototyping one.