

Introduction: Wooden Bluetooth Remote for Lego Duplo Train


My kids loved this little Lego Duplo train particularly my youngest who struggles to communicate herself with words so I wanted to build her something that would help her play with the train independently of adults or phones/tablets. Something that would add a extra dimension to the train and give it extra play value
The Lego set already has few way to control the train, you can push it forward to start and hold it to stop it, you can control it using colour tags that go on the track so when the train pass it over it triggers different actions ie forward, reverse, play sounds turn on the lights. You can also download a app for you phone or tablet that can connect to the train via bluetooth.
Here a full review of the train
After hunting around on the internet I found there there was quite few different people that had all ready written code to control the train. The 'Poweredup' node writen by nathan.kellenicki (https://nathan.kellenicki.com/node-poweredup/) looked like a perfect started, It was written using Javascript which I wasn't not partially familiar with but thought if I could find java based microchip, this would be a good start.
Again after hunting around on the internet again I found the espruino system, this is similar to the ardiuno but base around javascript. The espriuno code could be loaded on to a MDBT42Q mircochip that had bluetooth embed. I thought if I could load the "powered up" module to it I would be half way there, however this simple wasn't the case a the module contained to many libraries to large to load on the MDBT42Q, so it seems I have to find a simpler solution ....
Step 1: The Code

Esprinuo
For those that don't know the Espruino platform https://www.espruino.com (and i didn't) is it very similar the Arduino, There a few main difference one it written for javascript rather c, It feels slight newer so there lest examples however the support via the forums are great and very helpful.
Javascript meet the train
The first hurdle was to connect to the train via bluetooth, This can be done using the NRF class that ships with in the espruino code.
NRF.connect can be use to connect to the train however your first need to find the address of the train itself, you can use NRF.findDevices to get this info
Once you done this you then need to send the train two value to handshake with the train, for my train this was "00001623-1212-efde-1623-785feabcd123" followed by "00001624-1212-efde-1623-785feabcd123" I believe this will be the same for all the steam trains set but the other versions ie the cargo set maybe different
Once you have this you can connect the train using function like the following, can you tell when the train has connect as it will flash it headlights blue
NRF.connect("e0:7d:ea:0c:03:29").then(function(g) { console.log("Starting connecting2"); gatt = g; return gatt.getPrimaryService("00001623-1212-efde-1623-785feabcd123"); }).then(function(service) { return service.getCharacteristic("00001624-1212-efde-1623-785feabcd123"); }).then(function(characteristic) { Characteristic_store = characteristic; return characteristic.readValue(); }).then(value => { console.log(value); }).then(function() { console.log("Train Connected"); connected = 1;The fun stuff
Now you connected to the train it's time for all the fun stuff like moving it forward, making sound and turning the light on and off. It's simple job of send the train a prep value, followed by the actual command ie
function play_horn() { console.log("message = ", Characteristic_store); const prepval = new Uint8Array([0x0a, 0x00, 0x41, 0x01, 0x01, 0x01, 0x00, 0x00, 0x00, 0x01]); const sendvalue = new Uint8Array([0x08, 0x00, 0x81, 0x01, 0x11, 0x51, 0x01, 0x09]); Characteristic_store.writeValue(prepval) .then(_ => { Characteristic_store.writeValue(sendvalue); });}<br>You may have to do a little digging around to find other command than the ones I used
Buttons and Levers
The physical side of the remote is very straight forward four buttons (to play sounds, turn the lights on and off) and one potentiometer that is connect to lever so you can control the speed and direction of the train
The button don't need pull up resistor instead you can do this in code, ie
pinMode(D15, 'input_pulldown');
You can connect the potentiometer to one of the inputs and then read it the analog signal using the following command
var reading = analogRead(D31);
The other difference to the arduino is that esprunio doesn't have a setup and loop. So instead I place all the separate command/triggers into functions and then set up setInterval that loops every 100 milliseconds, listening to the button then run the required function when the button has been pressed.
if (digitalRead(D15) == 1) {<br> play_horn(); }Actioning the lever was little more complicated as wanted to be able incrementally adjust the speed so first I had to send the analog value to function
var reading = analogRead(D31);train_direction(reading * 1024);
Then in the train_direction function I broke down the command to 6 different increments based on the pot value
All the way up, tells the train to go full speed ahead
Half way up, tells the train to go forward at 50% speed
Middle, tells the train to stop
Half way down, tells the train to go backwards at 50% speed
All the way down, tells the train to go full speed in reverse
ie
function train_direction(dir_val) { //console.log("message = ", Characteristic_store); const prepval = new Uint8Array([0x0a, 0x00, 0x41, 0x01, 0x01, 0x01, 0x00, 0x00, 0x00, 0x01]); const sendvalue = new Uint8Array([0x08, 0x00, 0x81, 0x00, 0x01, 0x51, 0x00, 0x00]); if (dir_val > 300 && dir_val < 400) { const sendvalue = new Uint8Array([0x08, 0x00, 0x81, 0x00, 0x01, 0x51, 0x00, 0x1e]); } if (dir_val > 400 && dir_val < 500) { const sendvalue = new Uint8Array([0x08, 0x00, 0x81, 0x00, 0x01, 0x51, 0x00, 0x32]); } if (dir_val > 500) { const sendvalue = new Uint8Array([0x08, 0x00, 0x81, 0x00, 0x01, 0x51, 0x00, 0x64]); } if (dir_val < 300 && dir_val > 200) { const sendvalue = new Uint8Array([0x08, 0x00, 0x81, 0x00, 0x01, 0x51, 0x00, 0xe2]); } if (dir_val < 200 && dir_val > 100) { const sendvalue = new Uint8Array([0x08, 0x00, 0x81, 0x00, 0x01, 0x51, 0x00, 0xce]); } if (dir_val < 100) { const sendvalue = new Uint8Array([0x08, 0x00, 0x81, 0x00, 0x01, 0x51, 0x00, 0x9c]); } Characteristic_store.writeValue(prepval) .then(_ => { Characteristic_store.writeValue(sendvalue); });}The full code can be down for the link below
Attachments

Step 2: The Wiring


The wiring the was the simplest part
It just consisted on 4 push button connected to D15, D16, D17 and D18 with out any pull up resistor as this was done in the code and 1 10k resistor connected to D31
I am still working on the power supply but currently all the power comes form a micro usb breakout and this could them be connected directly to a power bank or a USB port
Step 3: The Build


The remote is mostly out of 3mm, 6mm or 9mm A4 sheets of plywood, They where cut on my CNC machine however using the template provided I would of though it wouldn't be impossible to do by hand
I am hoping the template and photos will give you all you need to remake however there few notes that might help
The 3mm Push Button mount is for sticking the push button on, the gap will position the button in the correct place but we allow you access the leg on the back so you can solder to the microchip, on the reverse you can also mount the MDBT42Q using some glue. On the front you will need to add so foam so it give the buttons a little bounce when you press them down you could also use springs
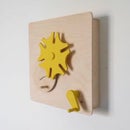
9mm buttons will need the logo's either paint, engraving or something else that to show what button does what
The Lever/Handle will need to be layered up, I used a 6mm dowel to help align them in all the correct positions

Participated in the
Toys and Games Challenge


